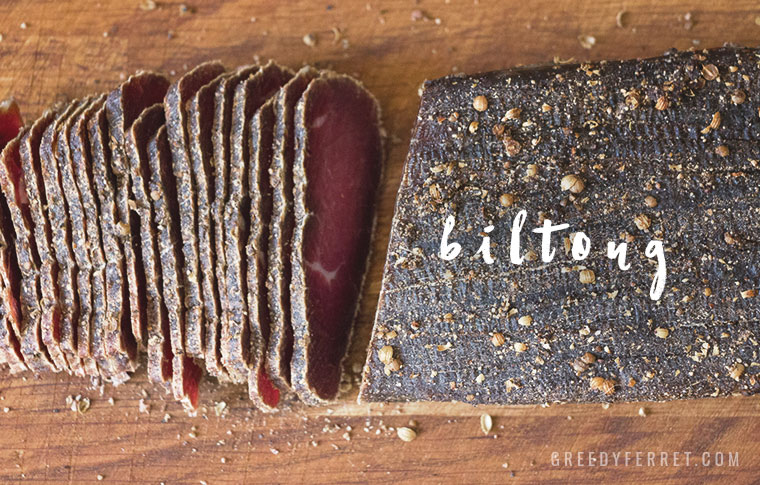
I must apologise for calling biltong “South African beef jerky”, because this is a far superior product. If you’ve ever tried biltong, you’ll know exactly what I mean—none of that sugary, rubbery stuff-it-in-a-dehydrator rubbish here, please!
Like a lot of biltong lovers, I was introduced to this culinary treasure as a child, and the addiction has stuck. I’ve been making my own for a few years, gradually tweaking the recipe and feeding it to people with a “how is it, honestly?”, and plenty of willing feedback. I’m confident that this fool-hardy recipe sticks with the traditional roots of the dried meat, whilst adding a little refined finesse—it does not disappoint.
Biltong was originally created by Dutch pioneers in South Africa, “Voortrekkers”, who needed reliable food sources on their long treks across the continent. The method and spice mix hasn’t changed much in hundreds of years, but a few variations have appeared recently, like ‘piri piri’ biltong and the use of additional ingredients like worcestershire sauce and dried chillies.
Curing process
Opinions vary on curing methods, spice mixes and drying conditions, and there is a lot of misinformation around, so trial and error has been my friend. Some recipes call for several stages of curing and washing off spices, reapplying them, etc—this is not necessary. I don’t like to throw away good spices, so I coat once, leave to cure in the fridge, pat dry, then hang with no additional stages. Why wash off and waste all that good flavour? It’s easy to over-salt biltong, making it almost unbearable to eat in bigger quantities (let’s face it, who’s going to only eat a little biltong?), and too much salt can leave a burning sensation, so many recipes call for the salt to be washed off with a water/vinegar solution. My answer? Use less salt! Vinegar does a perfectly good job of sterilising the meat without mountains of salt. The salt is an excellent flavour enhancer and should definitely be included—just a little less to avoid the need for washing.
Temperature and airflow
What we’re trying to achieve when drying biltong is to concentrate the flavour of the beef by removing a lot of the moisture, similar to ‘dry aging’. A combination of good airflow and relatively cool temperatures are the key to successful biltong making. Contrary to popular belief, heat is not required to make biltong—neither does it make for a better product. As a perfect example of this, the Italians make a beautiful beef product called ‘Bresaola’, which is very slowly air dried at cold temperatures, so as to achieve an even dryness and texture. Although heat doesn’t add to the quality of the product, it can be used to increase air circulation around the meat, by means of a temperature gradient (heat rises!). Having said that, don’t be tempted to try and make it in the oven—biltong takes several days to dry, and most ovens won’t go low enough to dry the meat slowly enough to avoid cooking it. What you’re looking for is a slow drying process with gentle airflow. Many DIY biltong makers will use a ‘biltong box’ with a fan and a lightbulb in to create good air circulation. The key is to draw air around the meat without the airflow being too strong, to avoid ‘case hardening’, whereby the outside becomes overly tough, and the texture gradient falls off too quickly.
How to dry biltong
I made my first biltong by hanging it from a piece of wood jammed into a window frame beside a cool window, with a fan on low to circulate air. That’s really all you need to make it. If you want a little more control, you can upgrade to a biltong box or other drying box. I’ve since upgraded to an old fridge with the mechanics removed, holes in the bottom, and a fan drawing air past the meat. The airflow is just enough to draw away moisture, but not too fast so as to avoid over drying the outside of the meat. What you’re looking for is cool conditions with good airflow. Room temperature in most houses is fine, but air flow can be a problem. What you want is a good steady stream of air running past the meat, but not too strong. Try to create these conditions in whatever way you see fit. Just make sure you have a little air flow, or the meat can gather mould—I’m sorry to say this has happened to me in the past! If you want to have complete control over drying conditions, either making or buying a ‘biltong box’ might be the best option for you. You can pick them up pretty cheap online.
Doneness—How long does it take to dry?
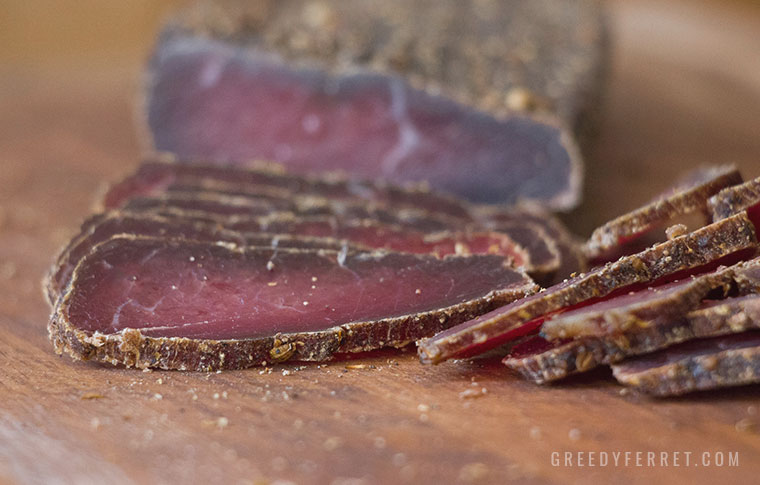
I like my biltong a little tough, but still wet in the middle. Some like theirs tough like old leather. Getting it right is down to trial and error. The easiest way to measure dryness is with your fingers. Thoroughly wash and dry your hands, and squeeze the flattest sides of the meat in with your fingers. If there is any give in the meat, there’s still moisture in the middle. Most likely, what you’re looking for is a really tough consistency with just a little bit of give. Leave it too long and you’ll have some tooth-bustingly tough biltong on your hands. That said, it’s fairly forgiving and a day or two over won’t do too much harm.
If you’re impatient and can’t wait for your biltong to dry, plan ahead and cut some thinner pieces to hang with the rest—these will keep you going while you wait for the thicker stuff to be ready. If you’re really savvy, you might vary the thickness of slices from thin to thick allow for consistent grazing over the drying process (highly recommended).
If you find that you’ve cut your biltong early and it’s wetter than you’d like, use clean fingers to rub a little salt and vinegar on the exposed end and hang it back up.
Fat on or fat off?
This comes down to personal preference. It’s important to note that, while your biltong will shrink by around half the size when dried, the fat doesn’t shrink at the same rate as the muscle. I like a little fat because it helps carry flavour, but I tend to remove most of it before hanging. Large chunks of fat can be a little unpleasant to deal with when eating biltong.
Biltong ingredients
Every biltong maker has their own preference on spice mix. If you don’t know what you like, I suggest making a few thinner, quick drying pieces to experiment with. Many home biltong makers add a lot of ingredients to their biltong, thinking that adding more will lead to a better result, but in reality they’re muddying the clarity of the flavour and masking the star of the show—good quality meat!
Vinegar
Traditionally, brown vinegar has been used to make biltong. It really has a recognisable flavour. Some recipes call for balsamic or cider vinegar. I recommend brown vinegar for the best flavour, with cider vinegar coming in a close second. I’ve used cider vinegar a lot, purely because I have a large batch I made at home.
Salt
Salt is a brilliant flavour enhancer and preservative. It kills bacteria on the outside of the meat, and helps to draw moisture out. It’s tricky to get the salt quantity right. My recipe uses the smallest amount of salt required to make a safe cure, based on the weight of the meat. My local butcher goes way overboard with salt on their biltong. I sometimes use them in case of emergency biltong shortage, so I’m not sure how to break it to them…
Coriander
Coriander seed is the signature spice that makes biltong instantly recognisable. It’s best to toast the seeds to release the oils for flavour, but also because the oil suppresses bacterial growth.
Black pepper
Black pepper and beef are a pair made in heaven. Just don’t overdo it—biting into a lump of peppercorn is not a pleasant experience! You want roughly 1/4 pepper to 3/4 coriander seed for a good balance. In most cases, flies aren’t a problem, but pepper has the added benefit of detering them.
Brown sugar
Brown sugar has a caramel and molasses flavour that adds complexity to the meat, without masking it. The sugar helps with drying through osmosis, latching onto the water molecules and ‘wicking’ them away. It’s not a traditional ingredient if we’re going full purist, but it balances the saltiness well. Too much sugar is really unpleasant though—you’re walking dangerously close to beef jerky territory and I’d really recommend against it. Biltong is a savoury snack, not a desert!
Bicarbonate of soda
Some recipes call for the addition of bicarbonate of soda. This might seem a little odd, but it has scientific reasoning. The bicarb neutralises the acid in the vinegar, but also acts as a meat tenderiser. It slows the contraction of the proteins, leaving the final product still dry, but less tough. Bicarb has a pretty unpleasant taste, so it’s important to keep the quantity low. If you’re using a good cut like silverside or toprump, you won’t need it at all.
Cutting methods
If you’ve ever tried cutting over-dried biltong, you’ll know how tough it can be—tough as old boots! In desperation, I’ve taken to resting a knife on top of some over-dried biltong and hitting it with a camping mallet (not recommended, and not only because I upset the neighbours and smashed the chopping board!). There are a lot of creative, almost ceremonial devices on cutting biltong, but I think nothing beats a good, sharp knife. If you want something a little more fancy, there are biltong cutters (a board with a hinged knife attached), biltong knives (traditional knives made for purpose), hand crank mechanical cutters, and at the high end, expensive elecric cutters, mostly used by butchers and biltong suppliers.
Dealing with mould
Check your biltong every day for mould. If conditions are particulary humid or hot, there’s a chance you might experience this problem. If you see the first signs of mould appearing—white dots or furry mould—use a clean cloth with some vinegar and dab/wipe it off. Be sure to get it all or it’s likely to spread again. If you’ve not checked for a while and found your biltong totally covered, sadly the best place for it is the bin. Good airflow will help to avoid such catastrophes in future.
Storing your Biltong
After your biltong has dried to your preferred consistency, you can continue to store it hanging in a well aerated space indefinitely. Shops that sell biltong will often hang it and leave it out, and these are ample storage conditions—just try to make sure none of the pieces are touching. It will continue to dry slowly, but it will also keep for a long time this way. If you’ve cut your biltong and want to store it, wrap it in a few paper bags and store it in the fridge. The paper will allow excess moisture to continue leaving the meat, discouraging mould growth. I can’t give accurate advice on how long to store it this way, but I think it’s safe to say that no sane person is going to leave biltong uneaten for more than a few days. It’s just too delicious!
Case hardening
If there is too much air flow around your biltong, the outside can firm up really quickly, leaving the middle soft. If the case hardening is severe, the tough outer layer can prevent moisture from leaving the middle. If you find that you’ve been testing your biltong for readiness for 2-3 weeks and it just doesn’t seem to be drying in the middle, this may be your problem. If you suspect that case hardening is your problem, I recommend cutting through the end of the meat and checking it. If you’ve got a really raw centre and thick, tough outer surface, give it a try and see if you like the texture. If you don’t, the first option is to vacuum pack the biltong and store it in the fridge for one week to one month, depending on severity. This will balance out the gradient. If you don’t have access to a vacuum sealer, stick your biltong in a paper bag and place it in the fridge for a few days. Rub a little salt on the cut ends to protect them. This should go some way towards fixing the problem. It’s worth noting that the thicker you cut your initial beef cuts, the slower the drying process must be to avoid case hardening, so try cutting thinner next time. However, the best solution to prevent case hardening from occurring is to change your drying setup to reduce air flow. You still need a little air movement, but the slower it dries, the more even the moisture gradient will be from inside to out.
So without further ado, here’s my tried and tested biltong recipe. Once you’ve given it a try, please let me know how you like it, and if there are any variations to the traditional ingredients you swear by, no matter how strange!
Oh, I also added an extra function to the recipe that allows you to change quantities based on meat weight – don’t say I don’t spoil you! 😉
Perfect Biltong Recipe
Ingredients
Meat
- 2000 g Beef—silverside or toprump
Curing spice mix
- 5 Tbsp Brown (malt) or cider vinegar
- 2.5 Tbsp Coarse salt (2% of the meat weight)
- 2 tsp Ground black pepper
- 2 Tbsp Coriander seed
- 1.5 Tbsp Brown sugar (optional)
Instructions
- Toast the coriander seeds in a dry pan, then grind down in a pestle and mortar or spice grinder. It should be mostly powder, with a few pieces of seed shells left in.
- Using a sharp knife, following the grain of the meat, cut into 1 inch (2.5cm) thick lengths and place in a non-metallic container.
- Combine all the spices and sprinkle into the meat. Sprinkle the vinegar on and rub everything in thoroughly whilst turning the meat with your hands.
- Cover the container and let your biltong cure for 24 hours in the fridge, turning and rubbing through the meat occasionally.
- Remove the meat from the container and pat dry with kitchen towels, taking care not to remove too much of the spice.
- Add a hook to the thickest end of each length. Plastic-covered paper clips make for a cheap solution. Hang in your biltong box, or in a well aired, ventilated space with a fan blowing gently to increase air flow. Do not point a fan directly at the meat (to avoid case hardening). Make sure none of the pieces are touching. Place some newspaper below the meat to catch any liquid.
- Drying times will vary with humidity, airflow and temperature. Test the readiness of your biltong every couple of days by squeezing the sides together with clean fingers. If you feel any give in the meat, it’s still ‘wet’ inside.
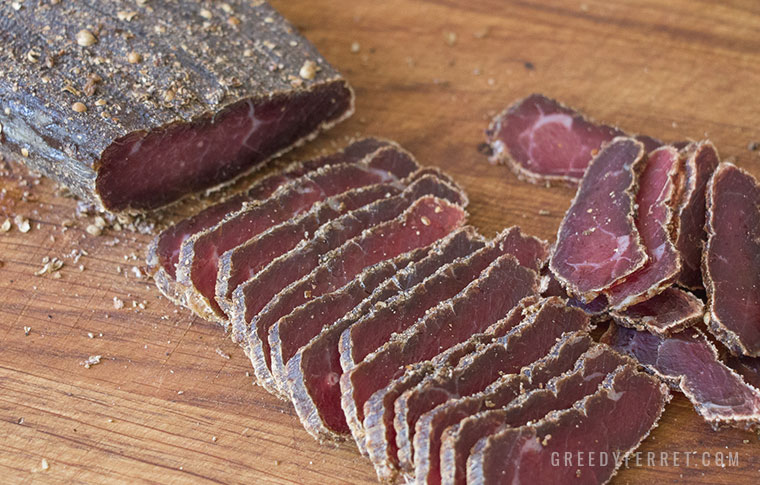
- Once ready, cut into thin slices with a sharp knife and enjoy some of the best meat you’ll ever eat.

So here is a South African problem for a South African delicacy… we have one of those “biltong boxes”, which has previously served us great! However, previously, we didn’t have so much load shedding! Will the biltong be okay with (up to) 10 hours load shedding a day?
Tried my first attempt at biltong, followed this recipe and it was incredible! I will make another batch with just a little more salt. I don’t even look at beef jerky anymore! Thank you for sharing with us, and the calculator is awesome!
Although born and raised in The Netherlands, we are not familiar with biltong. But our ancestors invented it after immigrating to SA.
Because my neighbours are from SA I got a chance to taste biltong. After that their family brought me an orginal biltong box from SA. Followed the recipe exactly as described here and got some decent results. Also another neighbour of us is experimenting and we would suggest the following changes; more salt can be used. And also we added some “chipotle”, basically smoked and dried Jalapeños. But to start with, the recipe is excellent. My SA friend were quite impressed with my first batch.
Excellent website. Very useful information. Well explained.
Thank you
Nice basic recipe as used by my family for many years. For biltong strips, cut tenderized steak into 2cm strips and follow the recipe. No need to slice it after wards – it breaks like a biscuit!
This is the most well explained and straight forward blog post I have found. Thank you so very much. I can now start my first batch of biltong with confidence.
Perfect recipe. I’ve made it about a dozen times, and it always turns out good.
I use a half pound of beefsteak (anything that doesn’t have much fat) and cut the strips in a variety of widths from 1/2 inch to 1 1/2 inch so that they cure at different rates, and I can enjoy over a few days.
I bookmarked your website years and years ago as found you were the best recipe. Then you disappeared and I cried. Just found out you’re back and to save myself a major maths equation you’ve added a superb adding thingy. Awesome. 4 1/2kg now drying
Best recipe, and love the weight tool you added.
Simply brilliant, best recipe on line- Tastes just like home
Great instructions and simple well balanced ingredients. I have used it with great success with beef, kangaroo, fallow and red deer meat. My Aussie and ZA mates all love it.
I’ve been using this recipe for the past 4 years. Now and then I had some Louisiana Cajun Spice for a kick. But what I love of the weight ratio you’ve added in. I work on a yacht and make it in the engine room, so perfect. This batch of for Saturday’s 🏉 rugby.
After so many failed previous attempts, finally your recipe worked beautifully for me…it’s like being back in south Africa again, Love it.
Can i exclude the sugar from the the recipe or replace with a sugar alternative?